2.14 Configuring the master keys

You must provide the information required for the MyID Installation Assistant to run the GenMaster utility to set up your master keys.
Note: If the generation of master keys fails during the installation, you can run the utility as a standalone program to set your master keys; see section 8.5, Using GenMaster.
To provide details for the master keys:
-
Select one of the following options:
-
New Installation – Application Tier – select this option if you are installing the primary (or only) application server.
-
Existing Installation – Additional Application Tier – select this option if you have already installed MyID on your primary application server, and are now installing MyID on an additional application server.
See section 2.14.1, Configuring the master keys for an additional application server.
-
Existing Installation – Upgrade Application Tier – select this option if you have already installed MyID and are upgrading your system.
Because your server is already configured, you do not need to set up your master keys, and can proceed to the next stage.
-
-
Click Next.

-
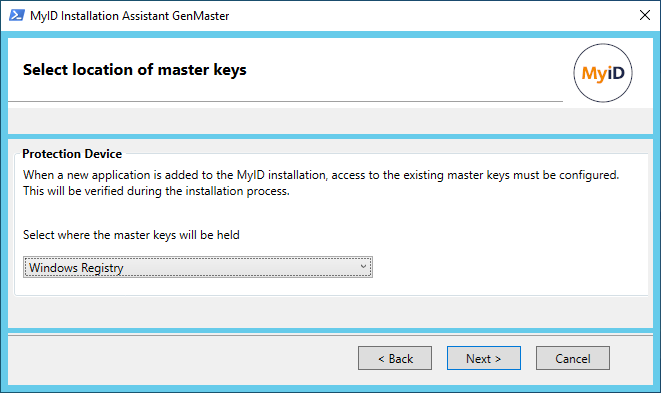
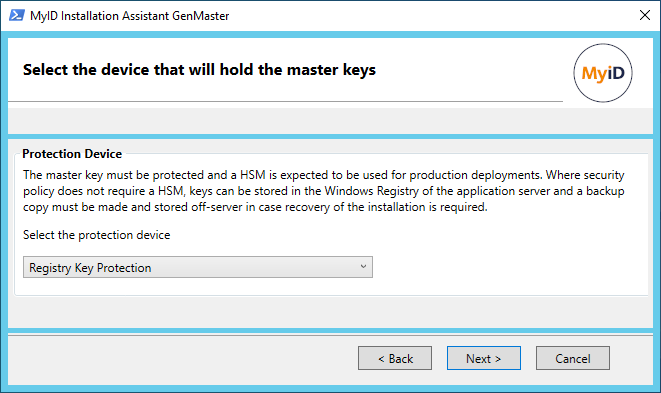
Select the protection device from the drop-down list.
You can choose from the following:
-
Registry Key Protection – the key is stored in the registry of the MyID application server.
-
Thales LUNA HSM – the key is generated and stored in the Thales Luna HSM.
-
Entrust nShield HSM – the key is generated and stored in the Entrust nShield HSM.
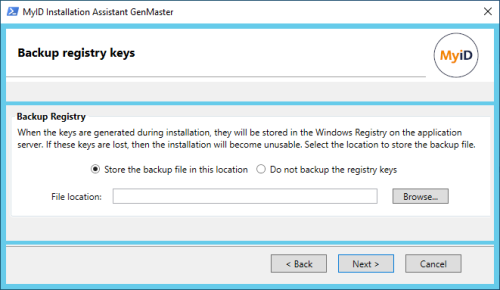
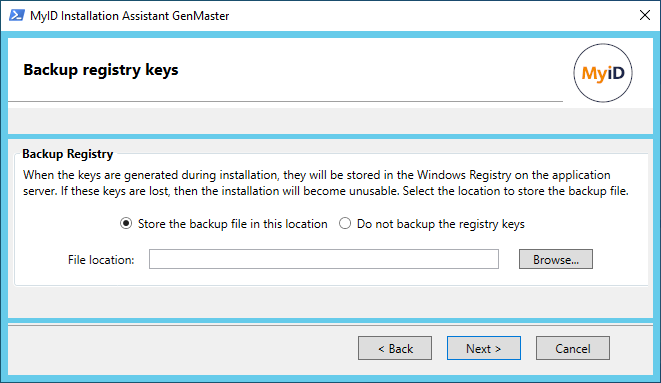
 To use the Registry Key Protection option:
- Select Registry Key Protection from the drop-down list.
- Click Next.
-
Select one of the following options:
-
Store the backup file in this location – click Browse and provide a location and filename for the backup registry file.
You are recommended to save this backup file to a secure location.
-
Do not backup the registry keys – skip the backup step.
-
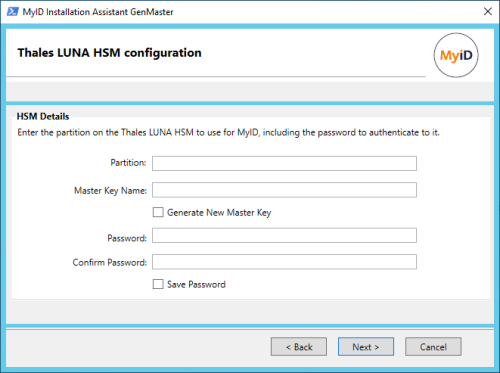
To use the Thales LUNA HSM option:
- Select Thales LUNA HSM from the drop-down list.
-
Click Next.
-
Provide the following information:
-
Partition – type the name of the partition that you want to use.
-
Master Key Name – type the name of the key you want to use.
If you have previously generated a master key in Keysafe (for instance if you are operating in FIPS140-1 level 3 mode), type the name of the existing key.
If you have not previously generated a master key in Keysafe, type the new name for the key you want to generate.
-
Generate New Master Key – select this option if you have not previously generated a master key.
Note: There must not already be a key of this name installed on the HSM.
-
Password – type the password for the partition; this is the HSM Partition Administrator password, not the crypto user.
-
Confirm Password – confirm the password for the partition.
-
Save Password – select this option to save the password.
If you do not select the Save Password checkbox, you must enter the password in the Card Manager Startup dialog box after any machine reboot before the MyID keyserver can start.
If you choose to save the password, the MyID keyserver starts automatically.
Note: This password protection is in addition to the HSM client certificate access control, so even if a user obtains the password they cannot use the HSM remotely unless their client has a certificate and has been authorized.
Important: If you choose to save the password, the password is saved in the registry on the MyID application server for the MyID COM+ user:
HKEY_CURRENT_USER\Software\Intercede\Edefice\MasterCard
The password is saved encrypted to the registry; see section 8.6, Setting the HSM PIN.
For more information, see the Thales Luna HSM Integration Guide.
-
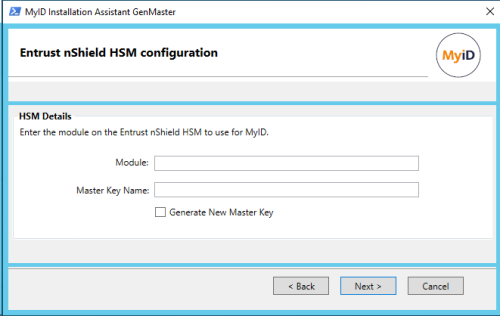
To use the Entrust nShield HSM option:
- Select Entrust nShield HSM from the drop-down list.
-
Click Next.
-
Provide the following information:
-
Module – type the name of the module you want to use.
-
Master Key Name – type the name of the key you want to use.
If you have previously generated a master key in Keysafe (for instance if you are operating in FIPS140-1 level 3 mode), type the name of the existing key.
If you have not previously generated a master key in Keysafe, type the new name for the key you want to generate.
-
Generate New Master Key – select this option if you have not previously generated a master key.
Note: There must not already be a key of this name installed on the HSM.
-
For more information, see the Entrust nShield HSM Integration Guide.
-
-
Click Next to move to the next stage.


2.14.1 Configuring the master keys for an additional application server
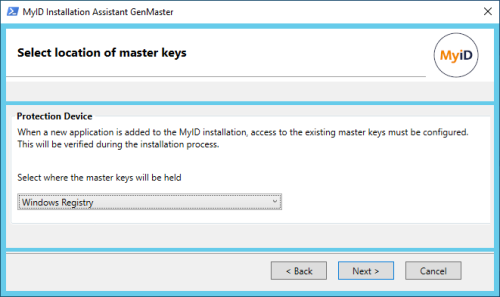
If you have already installed MyID on your primary application server, and are now installing MyID on an additional application server, you do not need to create new keys; you can import the keys from your primary application server, then inform the MyID Installation Assistant, which then checks that the keys are in the correct place.
For detailed information about installing additional application servers, including importing the keys from one server to another, see the Multiple application servers section in the Advanced Configuration Guide.
To configure the master keys for an additional application server:
-
From the Select the installation type drop-down list, select Existing Installation - Additional Application Tier and click Next.
-
From the drop-down list, select one of the following options:
-
Windows Registry – select this option if you created the master keys in the registry on the primary application server.
-
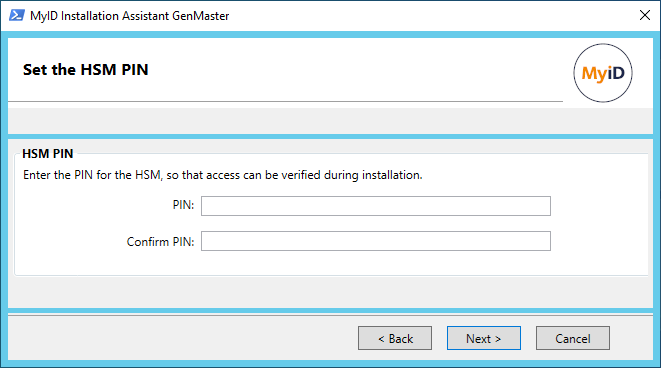
Hardware Security Module – Set HSM PIN – select this option if you created the master keys on an HSM when you installed the primary application server.
-
-
Click Next.
If you are using an HSM, the PIN screen appears:

Type and confirm the PIN, then click Next.